Wednesday, December 31, 2014

FO: Kevin's McQueen Sweater

I really owed Kevin a cabled sweater. If you recall, I attempted to make him one last Christmas and it failed. He did get another sweater to replace that Christmas-gift-gone-wrong, but it wasn't the kind of cozy cabled pullover that we had been discussing.

So, we began plotting from scratch for inspiration, patterns, and the perfect yarn. The yarn turned out to be the easiest part. We set out on a trip over to Tolt last spring just knowing they'd have the perfect sheepy, earthy yarn and were not disappointed. We considered using Imperial Stock Ranch's Columbia, Rowan Felted Tweed, and Peace Fleece but finally decided on Studio Donegal in Oatmeal. It's soft and springy, yet still feels durable with a lovely tweed. 

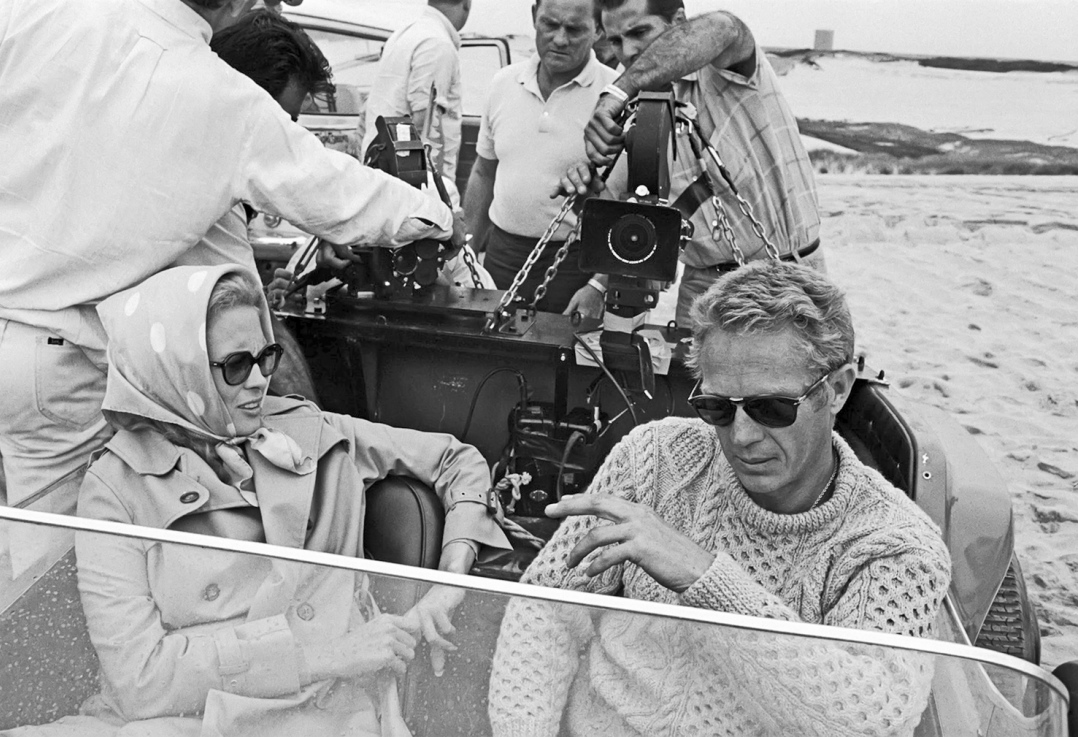
I then gave Kevin the task of looking around for images of sweaters he loved to use as inspiration. he kept coming back to this picture of Steve McQueen in a beautiful cream-colored pullover. I of course wholeheartedly approved of his choice of Mr. McQueen as style icon and began plotting and planning to bring it to life. Thus was born Kevin's McQueen Sweater. Although in reality this is a very traditional combination of Aran stitch patterns.

However, despite the fact that this is a very typical Aran style, I had trouble finding a pattern that was just right. I found some vintage patterns that were just too, well, difficult to read or even obtain. Some of the more modern patterns I found were of the 80's and 90's era of exaggerated drop shoulders and baggy fit that I feel are kinda yuck. The most modern patterns were right on for fit and shape...but the stitch patterns were also updated, tweaked, or reinterpreted from the super classic styles. As it turned out, I just couldn't find a pattern that combined a modern shape and construction with an old school stitch pattern. So, I decided to jump full in and make one up.

I started with Shelagh Hollingworth's book Traditional Aran Knitting and swatched my little heart out. This was truly the year of swatching as I focused on becoming a better sweater knitter and this project was a wonderful challenge. After swatching my honeycomb, trellis, six stitch simple cable, and moss stitch it was time for the maths. Eek. Many numbers were crunched. Many charts were (incorrectly, then correctly) drawn. When I had my swatches and charts just right, I used Elizabeth's Percentage System (EPS) for my calculations and was ready to cast on. I liked my fabric and tension with size US 8's for the cable-y bits, and went down to a size US 6 for the ribbing.

The sleeves and body were all knit in the round from the bottom up, then I worked flat for the neck, armhole, and back shaping as well as for the sleeve cap. I was very unsure of how to achieve a set-in sleeve all on my lonesome. All the EPS sweaters I've made before (ahem, all two of them - here and here) had raglan and saddle shoulder shaping, and EZ doesn't lay it out as nicely for set in sleeves (at least in Knitting Workshop). So, I used a pattern I'd used before as a guide since the sizing, gauge, and fit I was going for were very similar. It the end, it worked out perfectly! I was really preparing myself to have to do the armhole and sleeve caps over at least once, but it wasn't necessary. Hurray for success on a first try!


Would I do anything differently looking back? Hmm. Yes. First off, even though all of this yarn was the same dye lot, there was a slight color variation from hank to hank. It wasn't noticeable at all in hank form, and I really didn't even see it until I blocked. Waaaaay past the point of ripping back. I certainly didn't notice it while I was working, and don't notice it even now unless I stare at it in just the right lighting, but it is very noticeable when sopping wet (not a huge concern) and to the critical eye. So there's that. Second, I think I'd cast on less stitches at the waist, then increase gradually a bit through the body. It could be a little bit snugger at the waist. I think I'd also knit the sleeves flat (gasp!) for ease of blocking. The fabric of the honeycomb stitch is so dense and tight that I think it really benefits from a flat rather than tube blocking. Overall, that's a pretty short list of regrets and I am thoroughly pleased!


And then I made him stare into the sun while I took his picture...

Wednesday, December 24, 2014

Christmas Sweater Project - IT'S DONE!

It's finished! It's finished! And I'm in love with it. Even though it's now near the end of December, I did in fact finish this in time for the first of the month (even a bit before I think) and have been wearing in quite a bit. My original stated goal of "every friggin' day" is of course impossible since it's generally not considered prudent to wear the same outfit every day. However! It has gotten LOTS of wear, especially to winter/Christmas/festive events and outings throughout the month. I even wore it to work on December 1st to celebrate the start of the best month ever.


I can't overstate how much I love this sweater. This project confirmed that colorwork is really my favorite thing. I love both the process of it (aka the knitting) and the final look. It's wonderfully entertaining to work on and I love how bold the design is. Knitting it this way in little increments over the year was very enjoyable. I loved always have a project on the back burner to work on in between other things combined with not having the pressure to finish as soon as possible. I'm tempted to do it again for next Christmas, although in reality I probably won't. I haven't yet formed my knitting agenda for 2015 but I predict it will include less sweaters since I was sort of a sweater-only fiend this year.

As far as mods go, I did make a few. Most visibly, I added in the white as a fourth color. For the charts, I planned out where I wanted to insert the white and am very pleased with how it turned out, both in terms of how the modifications to the chart interacted with each other and the extra pop of bright white in the finished object overall. I also shortened the length of both the body and the sleeves to fit a little higher on the waist and the wrists. This is just a personal preference of mine for pullovers since I typically like to wear them with collared shirts and slightly higher-waisted pants. I like the look of the cuffs peaking out underneath the sleeves and the shape of a slightly higher waistline for the ribbing on my shape.

The only thing about this project is that when people find out that I made it and then inevitably ask how long it takes to "make something like that" I have a difficult time answering. I have no doubt their intentions are good, but A) don't make me think about how long knitting a garment takes or I shall never undertake it again and B) I have no idea since it was so spread out.

Final verdict is that this project was a huge success!

Sunday, December 7, 2014

Overnight to Shriner Peak

Here at the Churchill household we did our best to make the most of the late summer season. Yes, I said late summer and it is now winter. Ah well, better late than never with this post.

I'll admit we got off to a terrible start for the first part of the summer with very few overnight outings or day trips. Nothing on the scale of the infamous Churchill Family Yurt Tour 2013, that's for durn sure. But. BUT. Washington has saved us with a string of almost-too-good-to-be-true beautiful late summer weekends. Sorry rest of the country if that was not the case where you live.

On one such weekend, we decided to drive down to Mount Rainier National Park for a quick backpacking trip. One of my goals for the summer was to do more of that. We've had most of our gear since last year's Rialto Beach trip, but haven't used it for actual backpacking since then. Just a couple of regular old camping trips. So, we woke up, saw Rainier as clear as day from the city and decided to pack up and go for it.

We set out with nary a plan as to where we'd actually hike and camp. Because who needs to plan anything when going backcountry camping? KIDDING. We planned a little bit in terms of knowing the permit system and the fact that there were lots of options available for first-come-first-served sites. Luckily, Park Rangers are just the coolest. And luckily when we arrived we were the only ones in the office and this particular ranger appreciated rather than scorned our open-ended plans. He showed us what was available and suggested Shriner Peak.


Oh. Man. Best suggestion ever. The hike itself is moderate at 4 miles with a 3434 foot elevation change. There are only two campsites and the top which means it would not be crowded at all. And, it's got one of only four historic fire lookout buildings at Rainier National Park! This is all before mentioning the spectacular 360 degree views.


It starts out with a pretty steep ascent in a very forested area. It was a bit tough considering this was our first time doing an overnight trip with all our gear that included such an elevation change. I mean, I was sweating. But our packs felt good and it was really nice to be out. When we came around this corner, well, that was just about it. Look at this view:


What a sight! It's really a very good reward for not too demanding of a hike. We made it up and set up camp with plenty of time to spare before sundown. Both sites were empty when we arrived, which meant we were free to take the better one. Really, does it get any better than this?


After getting set up we walked back to the fire lookout and had our dinner on the wrap-around porch. I can't get over how beautiful the view of Mount Rainier is. I could stare at it for hours, and in fact did. Kevin did some really high quality glassing from the porch as well. The elk were really calling to each other and he was really hoping to see one through the specs. Unfortunately, they were either too far away to be visible or tucked into the trees, so we were only able to hear but not see them.


That night we happily tucked into our cozy tent with our heads toward east so we could be sure to see the sun come up. The sky was completely clear and the stars were just spectacular. Everything was quiet except for the elk, who continued to call as it got darker and darker.


The next morning, the sunrise was even more beautiful on the mountain than the sunset had been. You could really see the colors and shadows changing on the glaciers and I couldn't stop snapping pictures every few minutes as it transformed. It was a bit chilly, but not too cold and we were plenty bundled.


Even though we never saw any elk, we did see a track pretty close to our camp that had definitely not been there the night before. I get super excited by spotting animal tracks, especially when I see them before Kevin, and had to point this one out.


After a light breakfast we packed up camp with the sun on it's way up and started our trek down. It was so different to be on a hiking trail and not see anyone for so long! Usually on a lot of the hikes we've done out in Washington we see a lot of people on the trail, but this morning we were out ahead of everyone. I shouldn't say we didn't see anybody though. About a third of the way down, right among the huckleberry bushes, we interrupted a breakfasting black bear! Kevin was walking first at that time and saw him (or her) before I did. They both stopped in their tracks and stared for a few seconds before the bear turned and took off away from the trail. I barely even saw his little behind lobbing off into the brush! It was comforting to know he was so scared of us, but we still waited a bit before continuing on and made sure we were nice and loud through the rest of the huckleberry bushes.


We made it down in good time and did our usual post-camping/hiking tradition of stopping at a diner on the way out. There's nothing like a hot plate of hashbrowns and eggs after a night spent outside!

Sunday, September 28, 2014

Long Loved Thrifts: Floral Suitcase

Soooo, I haven't exactly met my goal of posting more this year than last. On the one hand I am completely, 100% okay with this. This blog was always intended to be a fun project and not a chore, so when it's moved down on the priority list I've been totally fine with that. Some life events have also happened this year to contribute to the blog-less-ness. First, I started working full time again, thus leaving less time to loaf around coffee shops with my laptop. Why yes, I am a cliche. Thank you for asking. Second, I've started a new job. Twice. That's right, I started a new job around March then ended up leaving that job to start a new one in August. So there's been lots of general exhaustedness going around as I cram new job knowledge into by brain and get adjusted to the new schedule. Also, the first job included working weekends. So yeah.

On the other hand, I want to get back into a routine of posting at least once per week. I loved the 52 Tuesdays project as a way to stay with that schedule, but ultimately decided to take a break from it this year rather than making it an indefinitely ongoing series. That said, I miss posting about my thrifted goods! Hence, a new idea!! This idea is a combination of wanting to post more about second-hand finds, share their stories, and also add another element.

How do I say this...I like things. I get attached to them and like them for a really long time. I've been this way for, idk, my whole rememberable life I guess. As a wee girly I was super attached to all of my stuffed animals. They had names and I was very concerned about their feelings. Since most were gifts, it started with becoming instantly attached to them after the unwrapping process. It was like I was really being introduced to someone, and beyond that I had just rescued them from their packaging. I also used to rotate my "favorite" stuffed animal so none of their feelings would get hurt by not being given as much attention as the others. This may or may not be a symptom of only child syndrome...

I'm happy to say that as an adult I no longer think inanimate objects have feelings (phew). But I still really like things and particularly enjoy being surrounded by objects with meaning. I guess that's called being sentimental. Also, my taste doesn't change that much. There are lots of things that I've liked for a long time.

So now that I've rambled on for four paragraphs, let me introduce the first of a new series I'm calling "Long Loved Thrifts". The criteria are pretty simple. The item must have been purchased way, way back and still be in regular use. That is, in regular use and still loved. First up, this:


I can't remember exactly when I purchase this suitcase. Must have been high school at least if not earlier. I remember distinctly that I got it at St. Joe's Thrift Shop, which was my favorite thrift store for many, many years. I remember snapping it up immediately without a moment's hesitation. I mean, it's so good. Over the years I've used it for storage and for actual traveling. It fits perfectly in an overhead bin or even under the seat in front of you (insert my smug look as I watch the other passengers cramming their obnoxiously large roller bags into the bin). It also fits a surprising amount of stuff. I love this little guy. I doubt I will even get rid of it.

p.s. No offense to roller bag users. Of which I am one.

Sunday, September 21, 2014

Long Weekend at Glacier National Park

Did you know that Glacier National Park is only about nine hours away from Seattle? We didn't. In my mind, Montana was super far away. As in, too far away to consider driving with less than a week of time to spare. Oh how wrong! Kevin was the one with the idea for this trip, and after looking up the travel time we decided to go for it.

I recently started a new job, and had approximately one week off in between ending my previous job and starting the new one. So, Kevin decided to take a Friday off and we headed out of town for a short long weekend to Glacier National Park. True, it would be better to have more time, and some may think it's too long of a drive for such a short timeframe, but it's ideas like those that sometimes keep you from enjoying the time that you do have in favor of waiting for some more ideal future time that may or may not arrive. In other words, we didn't want to put it off just because it wasn't ideal.


We ended up taking off on Thursday night and drove from Seattle to Spokane, which is a bit better than half way. We got in pretty late, but it was worth it to get the extra head start. Before heading out, we went for breakfast at Frank's Diner, which was lovely. Funny story, though. I had a bit of a misunderstanding with the menu and ending up ordering what was essentially scrambled eggs with two sunny side eggs on top. Yup. Eggs on eggs. Ah well.


We drove the rest of the way to Glacier pretty leisurely and got to our first camp at Fish Creek Campground in the early afternoon. Camp was set up and extra groceries and firewood were procured. And some obligatory huckleberry ice cream (they seem to have huckleberry everything in those parts). Then the weather started to turn a bit and we got some rain. However, we were able to start a fire before it got too wet out and spent the night quite comfortably wrapped in a wool blanket enjoying the fire despite the light rain.


Saturday was our full day of exploring. Since we only had limited time, we decided to focus on driving Going-to-the-Sun Road and only doing a few short hikes along the way. The weather wasn't the greatest (a trend for the whole trip), so we didn't get the best views driving along the road. There was a lot of fog and a little drizzle, but we still got glimpses of views here and there as the clouds shifted.


 Once at the top, we did a short hike. Again, with intermittent views. I was pretty bummed that we didn't see any mountain goats - mostly due to fog - but we did get to see a marmot! It was just hanging out along the trail munching and not paying the slightest bit of attention to the passersby. I'd never seen one before and thought it was utterly adorable.

After the hike we drove the rest of Going-to-the-Sun Road, and were delighted to find that the other side of the pass was rain-free! We got some excellent both going down, and coming back through the second half of the road.


Saturday night we moved campsites to the larger Apgar camping area, once again were able to enjoy a fire (best part of camping!) and went to a ranger talk. We were so impressed with the ranger! She taught us all about the Whitepark Pine and it's symbiotic relationship with the Clark's Nutcracker. One super cool thing we learned about this particular bird is that once it harvest the pine nuts it hides them all around in little dug holes or caches. Then, it simply remembers were all it's caches are for later, and does a pretty good job of it too! In a world where we increasingly rely on technology rather than our good 'ole fashion memories I found this to be pretty cool.


Sunday was for packing up and heading out, as I started my new job on Monday morning and didn't want to cut it too close. The drive back was sunny and gorgeous, though, and the whole trip was worth the short amount of time we had. It was a good introduction to Glacier and we've now got lots of ideas for a next - hopefully longer - trip there.


Saturday, September 20, 2014

Christmas Sweater Project - July Update

This post has been in draft status for waaaay too long. As usual, my knitting kept up behind the scenes while my posts did not. There will also be no August update since I didn't pick this baby up one bit in August. Another larger project came up (to be shared at some point) and this guy took the back burner. No worries, though, as I'm still on track to finish by December and am feeling confident that I will.


As predicted, I tore through the whole sleeve in July rather than splitting it up into July and August per the original timeline. This means the body and both sleeves were done on schedule and I was able to join and start working on the yoke in September.  I'm very much looking forward to knitting through the yolk with all the fun colorwork. Wish me luck!
  • March - Knit 7" of body (half of 14")
  • April - Finish last 7" of body to the armpits
  • May - Make half of first sleeve
  • June - Finish first sleeve
  • July - Make half of second sleeve
  • August - Finish second sleeve
  • September - Join sleeves to body and start the yoke
  • October - Finish the yoke
  • November - Seaming, finishing, and blocking
  • December - Wear it every friggin day

Saturday, September 6, 2014

Hawaiian Shirt Redo

Personally, I am loving the Hawaiian print trend that has been exploding this spring and summer. Bold, obnoxious prints in bright colors? Yes, please. More of that.

I absolutely fell in love with this shirt from a store that Kevin and I like to browse, but really couldn't justify the cost for such a "trendy" purchase. Or justify the cost in general since it's way more than I spend on clothes, like, ever. So, as usual, I started to browse for nice flowy, Hawaiian print shirts in lovely colors on my regular thrift store circuit, preferably in an all natural fiber like cotton or silk. I wasn't having a ton of luck when it dawned on me that there is typically no shortage of such thinks in the men's shirt department. Obnoxious Hawaiian print shirts are practically a staple for any daddy-o (including my own if I do recall correctly). I had the idea to look for one in a particularly suitable print and do a little switch-a-roo. In no time at all I had found a peach of a silk shirt in an extra-large size with plenty of fabric to mess around with. I'm not a great seamstress, but it was a pretty small investment so I figured why not. Here's a before shot:


The general idea was to take the back of the shirt and turn it into the front, and then use the two front pieces to make up the new back. I wanted it to be sort of loose with a flattering neckline and sleeves. All in all I'm very happy with how it turned out, although I'll admit I bumbled through it a bit. Therefore, although I'm going to list my steps below, I'd advise thinking of this more as a general idea-generating guide and less of a tutorial. Alrighty, here goes.

I started out by roughly deconstructing it. I knew I wasn't going to be super tight on fabric, so I simply cut the side seams and arm seams rather than taking extra time with a seam ripper. I also cut off and discarded the back yoke section and the collar. I was then left with just the large back piece, right front, left front, and two sleeves. I left the bottom hems and sleeve hems intact so that they could still function as the hems. Less sewing for me = good.


Then I ironed everything and laid out the back piece. I took a good fitting shirt of the desired shape from my closet and laid it out on top, matching up the bottom hem. I carefully traced around it with a washable fabric marker on the wrong side leaving about a 1/2 inch seam allowance. At this point I just skipped the arm hole part and only traced the side seams and top shoulder seams.


Then I cut out the pattern based on my tracing lines. To make sure things were symmetrical I folded the shirt in half and evened out the side seams. Then I sort of eyeballed and freehanded the armhole opening while it was still folded in half, so that I did both armholes at once.


Next up was the neckline. I laid the guide-shirt out again and traced as best I could. Then, I cut out the using the traced line, folded in half, and symmetrified it just like the body. My next step was to use a seam allowance tool to measure one inch all the way around the neckline. This was so I could cut slits a little bit less than one inch all the way around for the curved hem. After the slits were cut (you can barely seem them in the picture), I ironed around the curve at the one inch mark then sewed a simple straight stitch for the hem.


With the front of the shirt basically complete, it was time to move onto the two back pieces. I started by removing the button band parts from both sides then laying them out over the new front piece. I lined things up so that the bottom hems were flush and so that there was enough fabric to totally cover the front piece.


Then, I cut around the sides to match the front and was then left with these two pieces. At this point the bottom edges were finished, and the cuts were made for the outside seams and arm holes.


Next I had to figure out how to make the two pieces symmetrical with a seam right down the middle of the back, while still keeping the whole thing the same size as the front piece. So, I laid out the front piece with the two backs on top of it flush to the sides and bottom. Then, I measured the half way point and added one inch on each side for a wide seam allowance. Then I traced that one-inch-on-each-side-of-middle line directly onto the fabric, unstacked everything, and cut along that line. To finish, I sewed up the middle line and had my two back pieces into one. The final step was to cut the neck hem by sort of free-handing the curve to be about an inch and a half higher than the front.


For the sleeves, I again wanted to use the existing hem for the end of the sleeve. So, I basically took the detached sleeve tube and laid it out under my guide shirt sleeve to get an idea of how long it should be and marked that approximate spot. Then I laid the sleeve tube out under the new shirt by the sleeve hole so that the armpit matched up with the place I had marked. Next I used the rotary cutter to freehand a curve the would fit into the sleeve opening.


I had thought the sleeve might need a little adjustment to fit together perfectly, but it turned out great the first time. I fit the sleeve into the sleeve pocket right-sides-facing and pinned all along the opening. Then it was a quick run through the sewing machine to attach the sleeve and I was done!


I did make a really stupid mistake when cutting the sleeves that I couldn't undo. When I cut them, I put the original underarm seam up towards the shoulder, rather than at the underarm. So, the sleeve seams sits on my shoulder rather than under the arm. I was pretty bummed with I realized my mistake, but in the end it gave the sleeves a sort of dolmon-esque quality and looks pretty good.


 Here's the final product!

Monday, July 28, 2014

FO: Flame Orange Tinder


It's no secret that I love secondhand things. And I'm lucky enough to have found a friend in Seattle that loves them just as much. Dear Sarah. This is wonderful for many reasons, from epic dual thrift raids to just being able to discuss the various merits and past scores of treasure hunting. What's doubly lovely is that we have very similar taste. These two things combine to create what is essentially another thrifting "me" who is out there scoring for finds even when I am not. As a result, there are often little lovelies left outside our door on any given day that seem to have appeared there by magic, or handed off in person accompanied by a very amusing "find" story.

The yarn for this sweater was just one such find. If I am not mistaken, Sarah found it at a thrift sale associated with the Pacific Northwest Needle Arts Guild and just couldn't help but scoop up the entire bunch. A move I very much approve of and would have certainly done myself. She then presented about ten skeins of it to me to do with as I wished. It's a lovely vintage 70's wool in the most obnoxious shade of flame orange. I refuse to call it by any other name, including the most obvious sportsman-friendly color. If you know what I mean (and I think you do).


I have to admit, I was at first a little skeptical of the color. It's so, so, so bright! In a good way...but I wasn't sure about it for a whole, one-color sweater, especially in this weight. I was originally thinking of combining it with a grey for a stranded, color-work yoked type sweater. But as I thought about it more and more I decided to just go for it. I started to envision a longer coat-style sweater with a textured stitch pattern and a funnel neck collar. I also found these lovely leather buttons at an antique store that paired wonderfully with the yarn.


After some pattern searching I found Tinder. Perfect. The only thing I didn't like about the pattern was the fact that it was knit in pieces and seamed. I HATE seaming, especially when it can be easily avoided. So, I did some simple maths (can't remember exactly what, but if you're interested I'm happy to count stitches and share) and went forward with knitting the left front, back, and right front all in one piece to the underarms. I then worked the pieces separately to the neck, still keeping a two knit stitch "seam" on the sides. The sleeves were also knit in the round to the underarm, then worked flat.

I'm thrilled with how it turned out and took advantage of the small stretch of chilly days we've had recently to wear it a few times. I also feel like this sweater was a big accomplishment for me because it's right in line with my goal of knitting more sweaters this year and doing it properly. I did the most legit gauge swatch of my life with this sweater and it paid off 100%. No re-knitting, tearing out, or over-vigorous blocking required. Which is a first I think. Here's to finally becoming a proper sweater knitter!

For the detail oriented...
Yarn: Brunswick Germantown, 100% wool, worsted weight
Pattern: Tinder by
Needles: Size 6 for ribbing, Size 7 for body and sleeves
Summary of Modifications: Fronts and back worked in one piece to underarms, sleeves knit in the round. Two inches of length added to arms, yo + k2tog buttonholes.
Raveled here.

These pictures were taken on Alki Beach on a beautiful evening. I couldn't help but snap a few pictures of the skyline, which I now cannot help but share: